| | GIMP Tutorial Archive |  |
|
|
|
| Author | Message |
|---|
xCreate
Member


Posts : 58
Join date : 2009-04-27
Age : 34
Location : New York
 |  Subject: GIMP Tutorial Archive Subject: GIMP Tutorial Archive  Fri May 01, 2009 4:56 am Fri May 01, 2009 4:56 am | |
| These tutorials are originated from the GIMP Thread in the IMVU group of ERG Please note that some tutorials have been edited and organized. Please ONLY POST TUTORIALS in this thread
TUTORIALS ON PAGE ONE OF THIS THREAD
Download & Find Brushes by: Extasy
Rotate an Image by: Extasy
Brushes by: EckoRedGirl
Resize An Image by: EckoRedGirl
Enhance Your Avi Skin by: EckoRedGirl
Add a Background by: EckoRedGirl
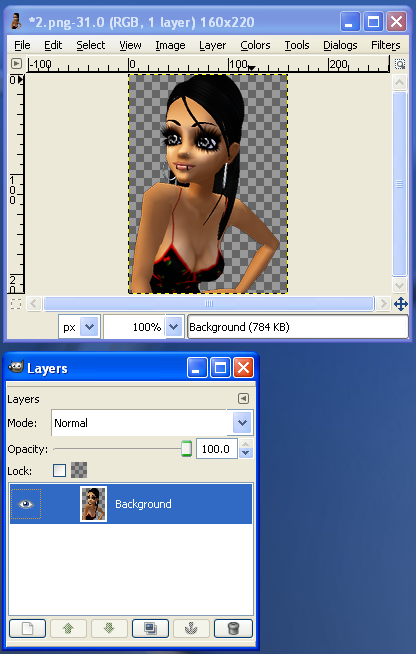
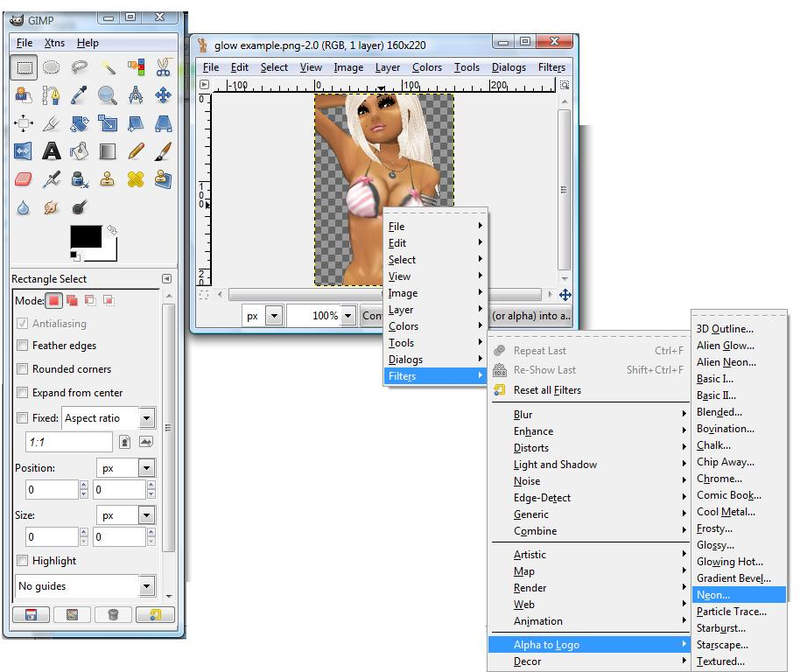
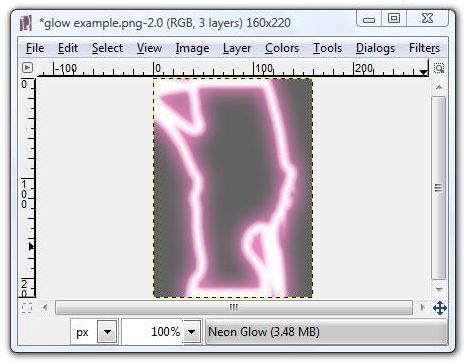
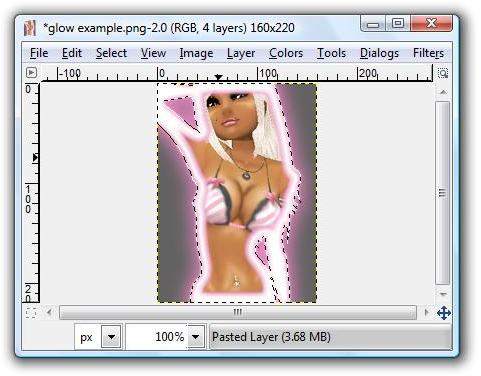
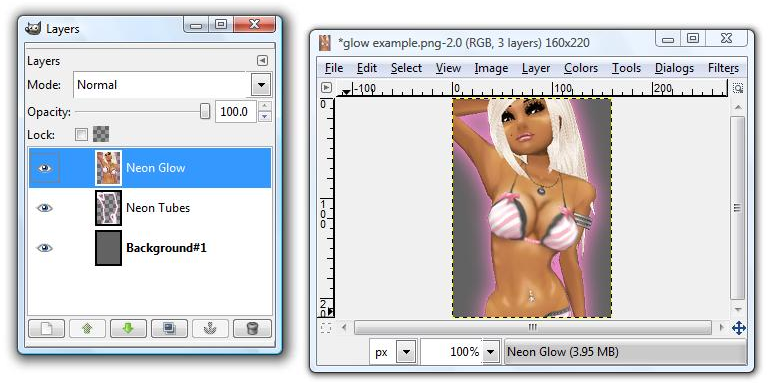
Add Neon Glow by: Extasy
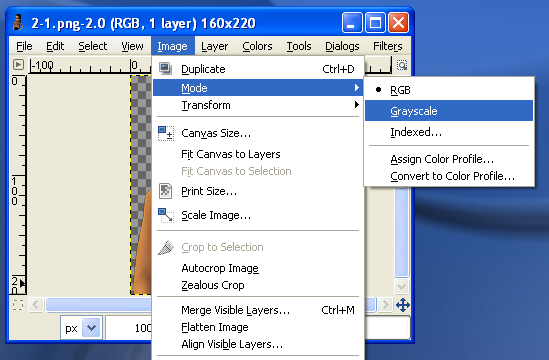
Make Your Pic B&W by: EckoRedGirl
Make Your Pic Look Old by: EckoRedGirl
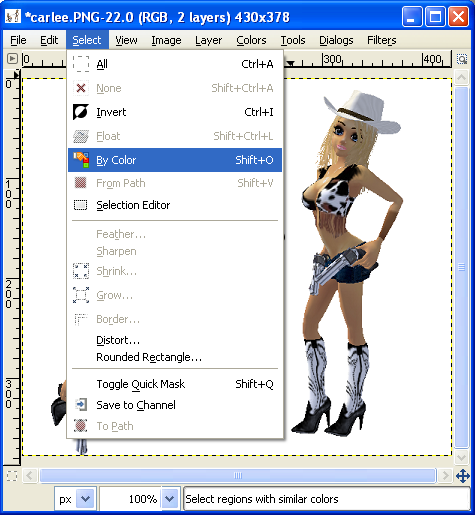
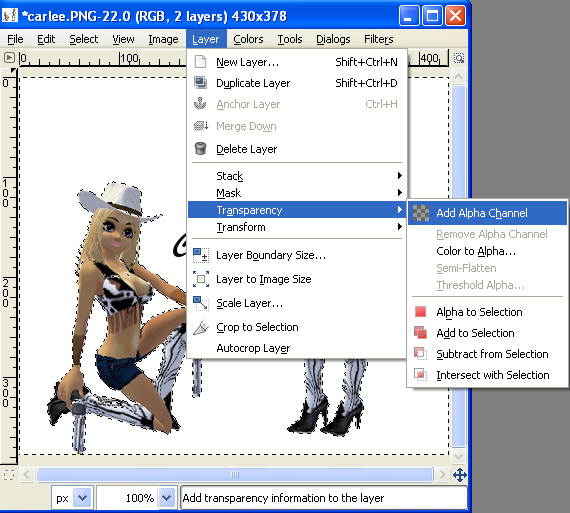
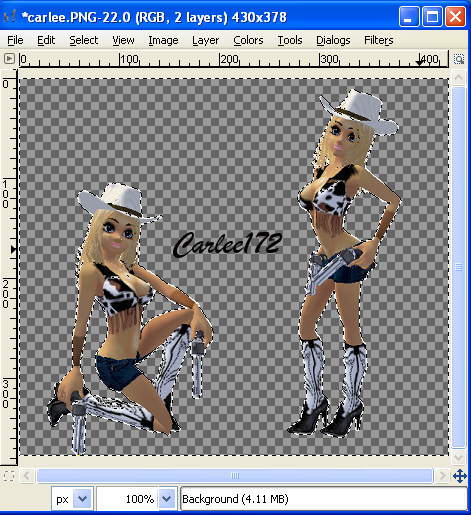
Making Your Image Transparent by: EckoRedGirl
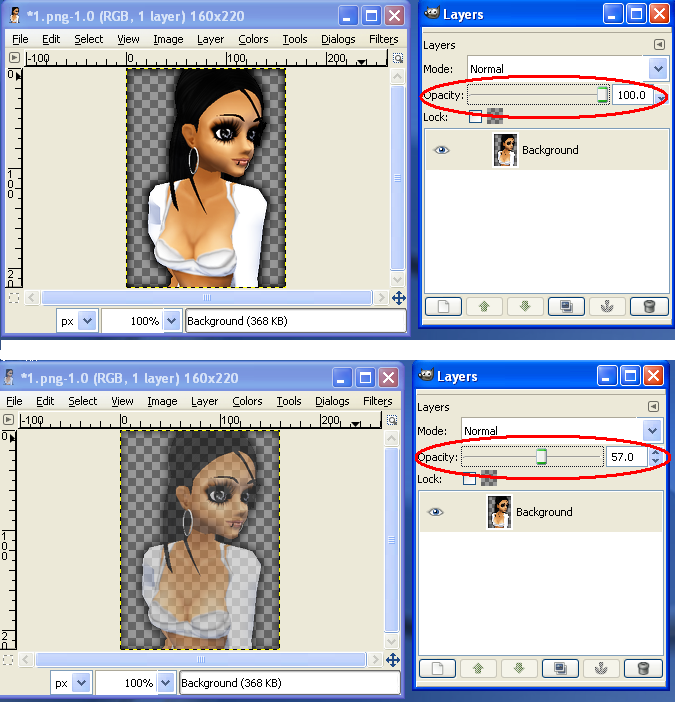
Changing Image Opacity by: EckoRedGirl
Resize Your Brushes by: EckoRedGirl
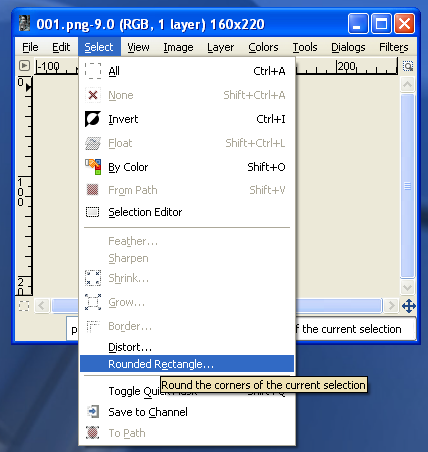
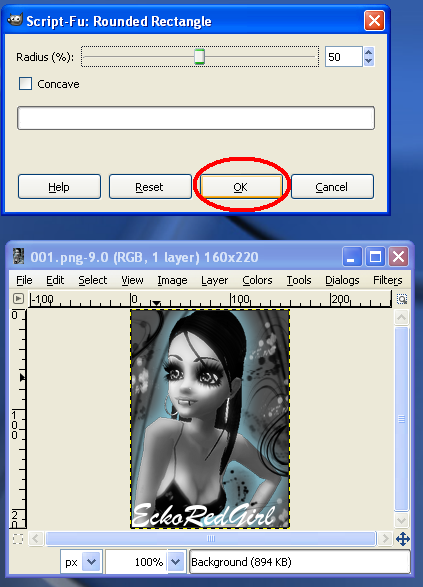
Make Your Image Have Rounded Corners by: EckoRedGirl
Compress Your Image by: EckoRedGirl
Blinking/Winking Pics by:EckoRedGirl
TUTORIALS ON PAGE TWO OF THIS THREAD
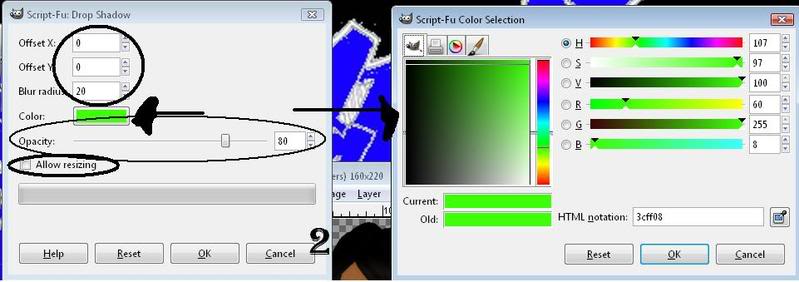
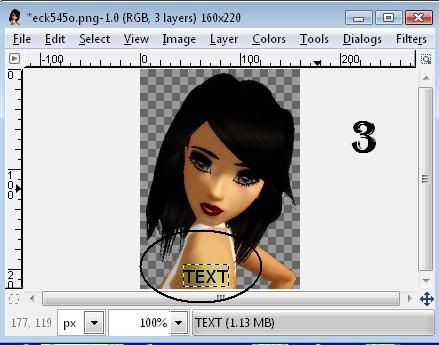
Drop Shadow On Text by: xStepOnMex
Adding a lined background to your image by: Extasy
Gimp ScreenShots by: xCreate
Making Reflections by: SelinaHart
Slow Down Animations by: Wonder/Yui
Advanced Skin Enhancements by: Wonder/Yui
Outlined Text by: Kishiko
Adding New Fonts by: Kishiko
Realistic Hair by: Preciiouse
Make Your Pic Look Like A Puzle by: xEmoxKimx
Create a Box around your text by: EckoRedGirl
Last edited by xCreate on Fri May 01, 2009 5:14 am; edited 5 times in total | |
|
 | |
xCreate
Member
Posts : 58
Join date : 2009-04-27
Age : 34
Location : New York
| | Subject: Re: GIMP Tutorial Archive Fri May 01, 2009 4:58 am | |
| How To Download Brushes by EXTASY
First go to www.deviantart.com and find something you wanna download (make sure it says it's for GIMP). Then on the left you have a bunch of choices. One of them is Download. Click that. A window will pop up saying if you wanna Save or Open a file. Click Open. It'll open the file. A window will pop up with a bunch of brushes. You can see what each of them look like by clicking it and a pic will show you what that brush you clicked on looks like. When you find which ones you like (it'll probably be all of them, but be careful because the more you add to your GIMP, the more memory it'll take up on yor computer), drag it over to the brushes file on your computer. If you want to drag more brushes at the same time, start at the last brush you want and highlight up. Then just drag all those highlighted ones together.
How To Find The Brushes Folder To Put The Brushes In
1.Outside of GIMP, go to My Computer where it has a bunch of disk drives.
2. Open your C drive folder on the side.
3. go to program files and open that folder
4. go to GIMP-2.0 and open that folder
5. go to share and open that folder
6. go to gimp and open that folder
7. go to 2.0 and open that folder
8. go to brushes and open that folder | |
|
| | |
xCreate
Member
Posts : 58
Join date : 2009-04-27
Age : 34
Location : New York
| | Subject: Re: GIMP Tutorial Archive Fri May 01, 2009 4:59 am | |
| How To Rotate an Image by EXTASY The red circle is in the spot where you click.
Then just click on the pic you wanna rotate and spin it any way you want.
 | |
|
| | |
xCreate
Member
Posts : 58
Join date : 2009-04-27
Age : 34
Location : New York
| | Subject: Re: GIMP Tutorial Archive Fri May 01, 2009 5:00 am | |
| | |
|
| | |
xCreate
Member
Posts : 58
Join date : 2009-04-27
Age : 34
Location : New York
| |
| | |
xCreate
Member
Posts : 58
Join date : 2009-04-27
Age : 34
Location : New York
| | Subject: Re: GIMP Tutorial Archive Fri May 01, 2009 5:01 am | |
| | |
|
| | |
xCreate
Member
Posts : 58
Join date : 2009-04-27
Age : 34
Location : New York
| | Subject: Re: GIMP Tutorial Archive Fri May 01, 2009 5:02 am | |
| | |
|
| | |
xCreate
Member
Posts : 58
Join date : 2009-04-27
Age : 34
Location : New York
| | Subject: Re: GIMP Tutorial Archive Fri May 01, 2009 5:02 am | |
| | |
|
| | |
xCreate
Member
Posts : 58
Join date : 2009-04-27
Age : 34
Location : New York
| | Subject: Re: GIMP Tutorial Archive Fri May 01, 2009 5:02 am | |
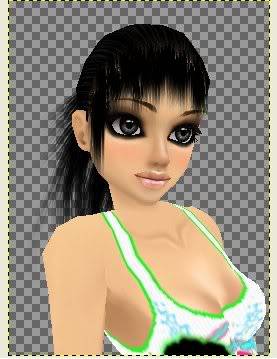
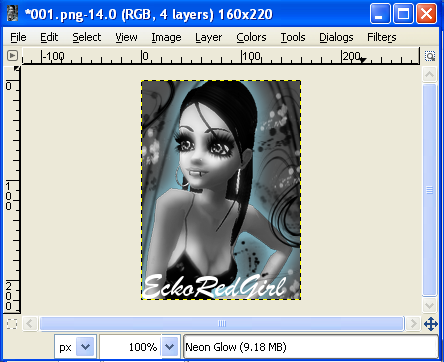
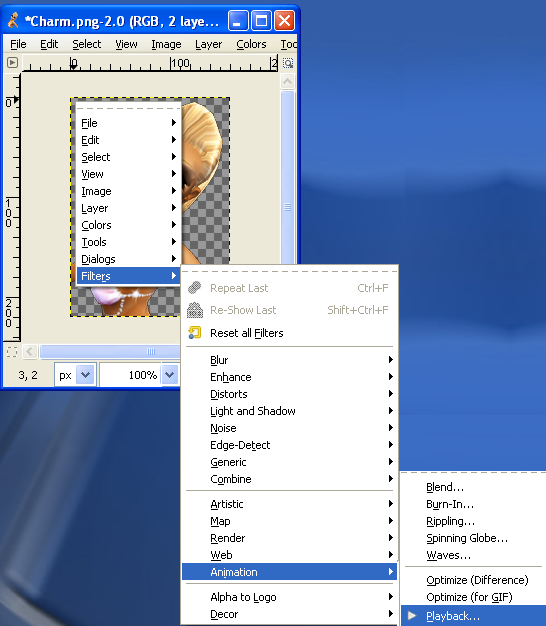
| Making your image look old by Eckoredgirl Obviously your first step is to open your image. I'll Use The Same Image As My Other Tutorials 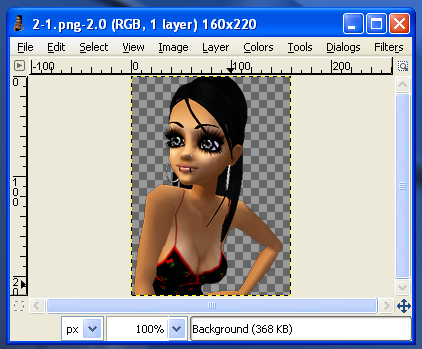 Now Right Click the image and go to FILTERS - DECOR - OLD PHOTO (see image below) 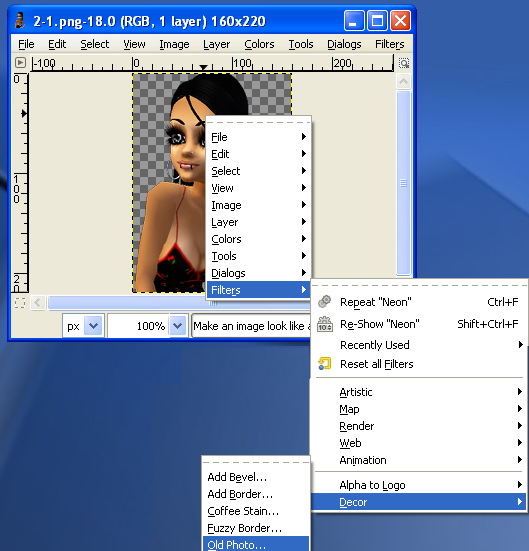 Now you will see a new box pop up that looks like the image below  You can simply click enter and leave the setting as they are, which I am going to do. Or you can play with the settings to get the old look you want. Ok so when you click enter this is what your image will look like 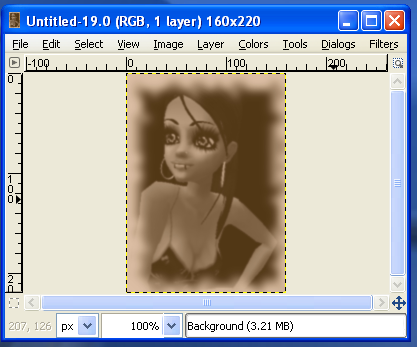 | |
|
| | |
xCreate
Member
Posts : 58
Join date : 2009-04-27
Age : 34
Location : New York
| | Subject: Re: GIMP Tutorial Archive Fri May 01, 2009 5:03 am | |
| | |
|
| | |
xCreate
Member
Posts : 58
Join date : 2009-04-27
Age : 34
Location : New York
| |
| | |
xCreate
Member
Posts : 58
Join date : 2009-04-27
Age : 34
Location : New York
| | Subject: Re: GIMP Tutorial Archive Fri May 01, 2009 5:04 am | |
| Resizing your brush by Eckoredgirl
This is very simple. All you need to do is 3 easy steps
#1 Click your paintbrush
#2 Click on the brush you want to use
# 3 Lower or Raise the Scale Bar to the size you want
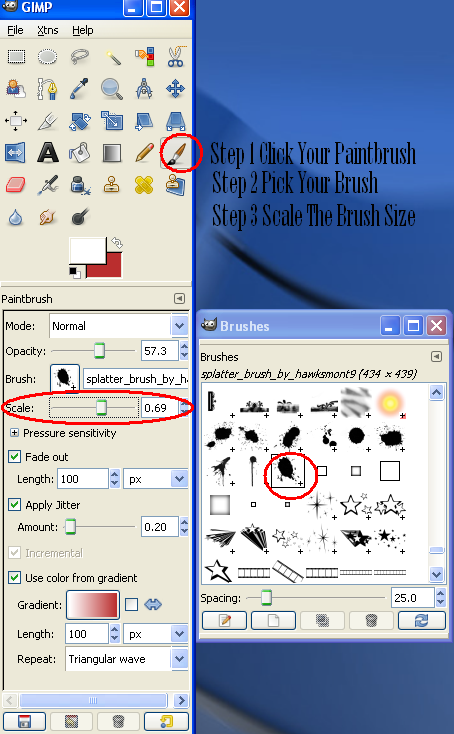
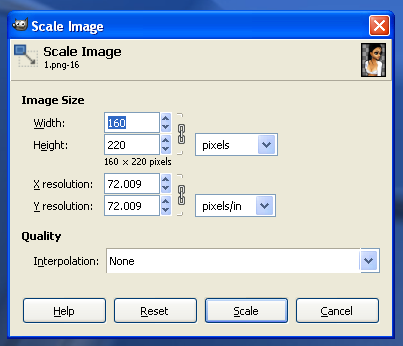
Choose The Size You Want and Click Scale | |
|
| | |
xCreate
Member
Posts : 58
Join date : 2009-04-27
Age : 34
Location : New York
| | Subject: Re: GIMP Tutorial Archive Fri May 01, 2009 5:04 am | |
| | |
|
| | |
xCreate
Member
Posts : 58
Join date : 2009-04-27
Age : 34
Location : New York
| | Subject: Re: GIMP Tutorial Archive Fri May 01, 2009 5:05 am | |
| Compressing your image by Eckoredgirl
This shows you how to compress your image so it's less kb.
This step is done after you've finished editing your pic to the point where you are ready to save it.
First click on SAVE AS and name your image then put .png after the name
Now a screen will pop up (see pic below)
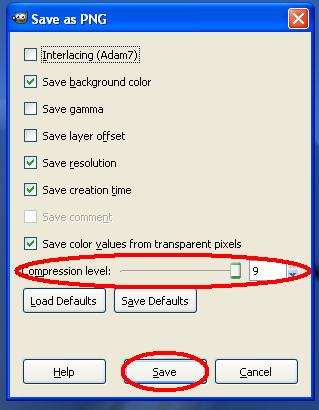
The bar that is circled in red is what you will move down to a lower number. If you have a HUGE pic lower it to about a 6. If your pic isn't extremely large just lower it to an 8.
You can play with this till its the right KB for you. Then click SAVE when your done!! | |
|
| | |
xCreate
Member
Posts : 58
Join date : 2009-04-27
Age : 34
Location : New York
| | Subject: Re: GIMP Tutorial Archive Fri May 01, 2009 5:05 am | |
| | |
|
| | |
xCreate
Member
Posts : 58
Join date : 2009-04-27
Age : 34
Location : New York
| | Subject: Re: GIMP Tutorial Archive Fri May 01, 2009 5:05 am | |
| | |
|
| | |
xCreate
Member
Posts : 58
Join date : 2009-04-27
Age : 34
Location : New York
| | Subject: Re: GIMP Tutorial Archive Fri May 01, 2009 5:06 am | |
| | |
|
| | |
xCreate
Member
Posts : 58
Join date : 2009-04-27
Age : 34
Location : New York
| | Subject: Re: GIMP Tutorial Archive Fri May 01, 2009 5:06 am | |
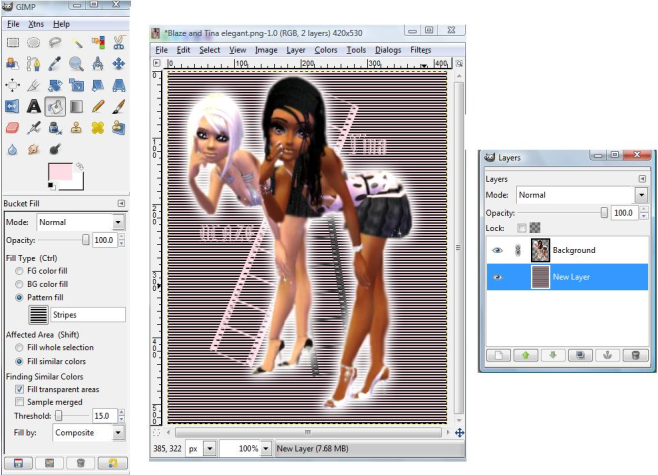
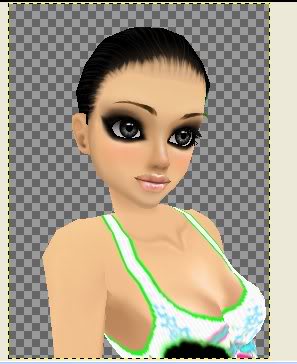
| Screen shots by xCreate
Part One.
1. Open the IMVU messenger: Then go to Rooms>Bionic White Room
2. Open your editing program: Gimp, Paint, Photoshop.
3. Expand your white room to fit your whole screen.
4. Pose, then take the screenshot by pressing the prnt scrn button in the right hand corner of your keyboard. It will look like nothing happened.
5. Select Gimp, and just press control (ctrl) V. (paste)
6. You should see your image. now it may look a bit smaller than usual, but thats normal...dont worry about that.
7. If you look at the Gimp messenger in the left top corner theres a little square, select it.
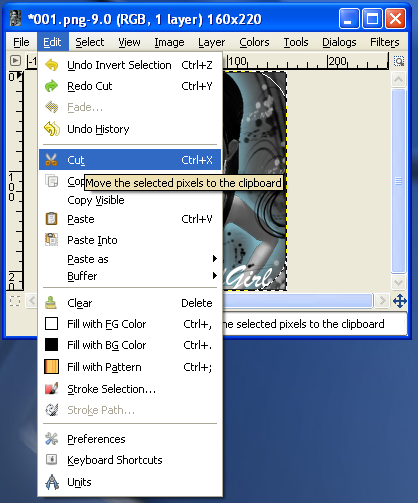
8. Make a square around your avatar, and cut it, (control X)
9. Exit out of that images remnants. dont save.
10. Paste (ctrl V) That cutted image after selecting Gimp.
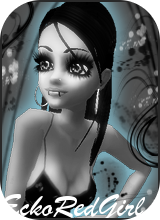
11. You should see your cropped image.
12. Now, you can eithier save, (next step) or make the white part of the image green, which is sometiems the requirements for the group images. ( part 2, step one.)
13. SAVE: File>Save.
Part Two
1. You should only do this tutorial after the first one.
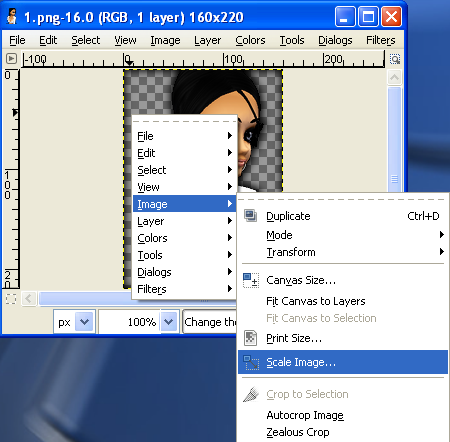
2. Now, open your image
3. Go to the Gimp main messenger, and click the "fuzzy select tool" it looks like a magic wand, its the fourth one from the right on the top.
4. Go to your image and select the white.
5. Go to the brush tool. (the one that looks like a brush? LOL)
6. Make the brush color lime green by going to the color box in the middle of the messenger and making it green.
7. Make the scale of the brush larger by going to the bottom section of the messenger and draggging the scale button to the right.
8. Color the WHOLE image green. The color will automatically go behind your avatar.
9. It should be mostly green, some tiny spots may be white still but you can zoom in (magnifying glass) and color it green.
(You can skip pt. 2 if you take your screenies in a green room *greaty suggested*) | |
|
| | |
xCreate
Member
Posts : 58
Join date : 2009-04-27
Age : 34
Location : New York
| | Subject: Re: GIMP Tutorial Archive Fri May 01, 2009 5:06 am | |
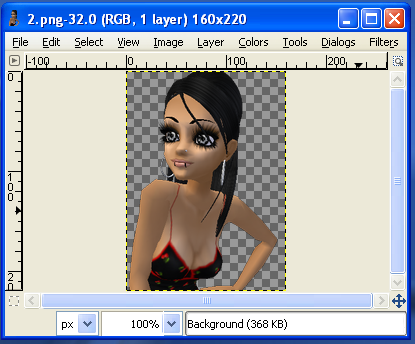
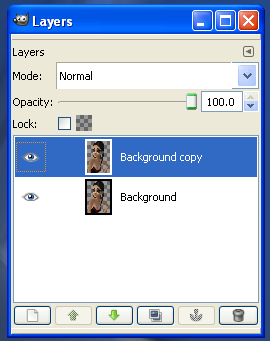
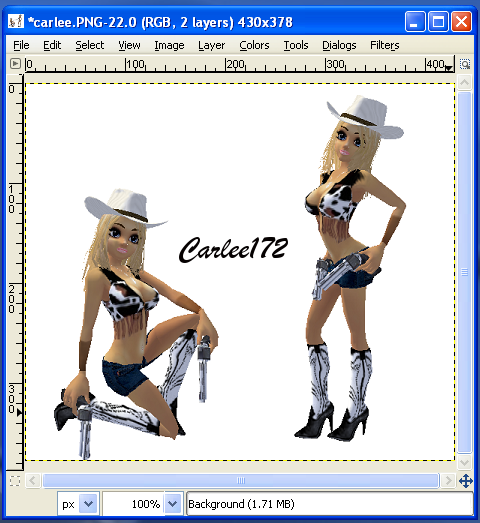
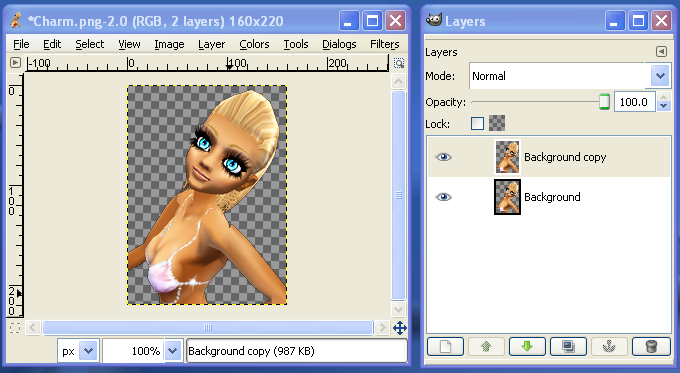
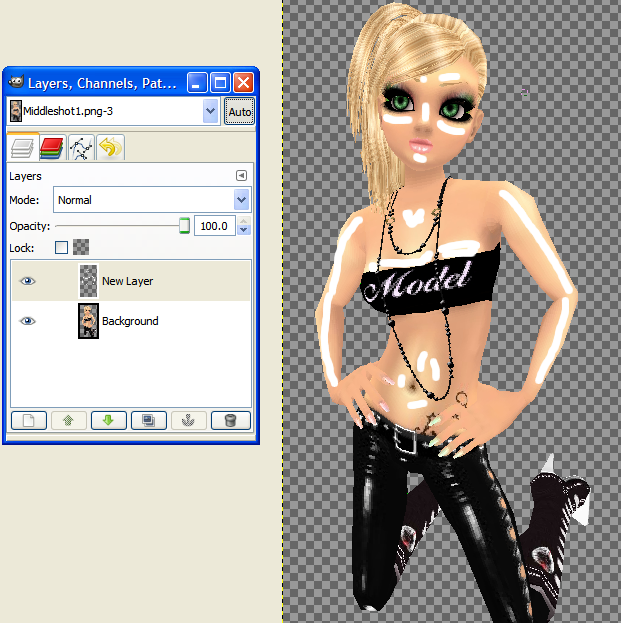
| Reflection by SelinaHart
1 ) Make sure you leave enough space at the bottom of your pic for a reflection.
Begin by duplicating your avatar layer (use the duplicate button at the bottom of the layers dialogue).
Make sure the bottom avatar layer is active as shown in the pic
2 ) Select your flip tool and make sure the flip type is vertical. Click anywhere on your pic and your bottom layer will flip upside down
3 ) Select your move tool, set it to "move the active layer". use it to move your upside down layer underneath your other avatar
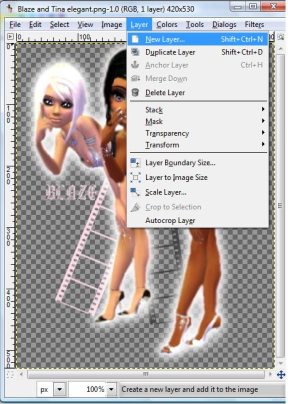
4 ) Go to layer > transparency > alpha to selection. create a new, transparent layer above your upside down avatar layer and make your new layer active
5 ) Select your gradient tool and set your gradient to "FG to Transparent". In the window your pic is in, hold ctrl and drag the gradient tool from the top of your avatar down.
6 ) Go to layer > transparency > alpha to selection. Go to select > invert. Activate your upside down (lower) avatar layer by clicking on it in the layers dialogue. Go to edit > cut. Delete the midle layer (the one with the gradient)
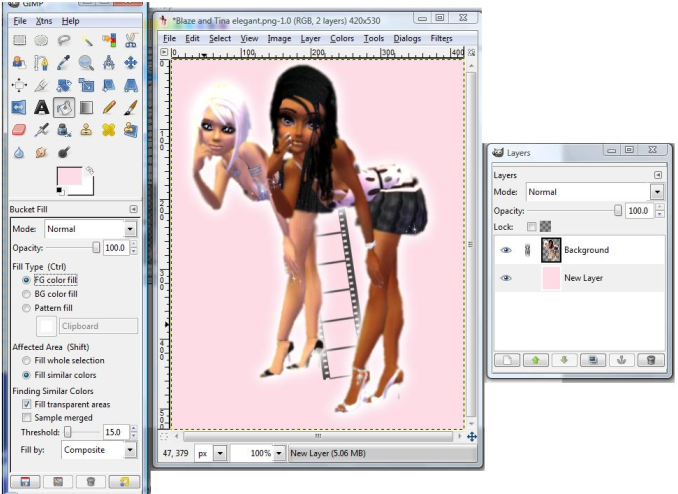
Add a background to make the reflection show up more (darker colours work well). if the reflection is too solid, you can fade the opacity on the reflection layer. here is the finished product:
If you want it to look like the reflection is in water, it might look good if you blur it or use the ripple filter on it (filters > distorts > ripple) | |
|
| | |
xCreate
Member
Posts : 58
Join date : 2009-04-27
Age : 34
Location : New York
| | Subject: Re: GIMP Tutorial Archive Fri May 01, 2009 5:07 am | |
| | |
|
| | |
xCreate
Member
Posts : 58
Join date : 2009-04-27
Age : 34
Location : New York
| | Subject: Re: GIMP Tutorial Archive Fri May 01, 2009 5:07 am | |
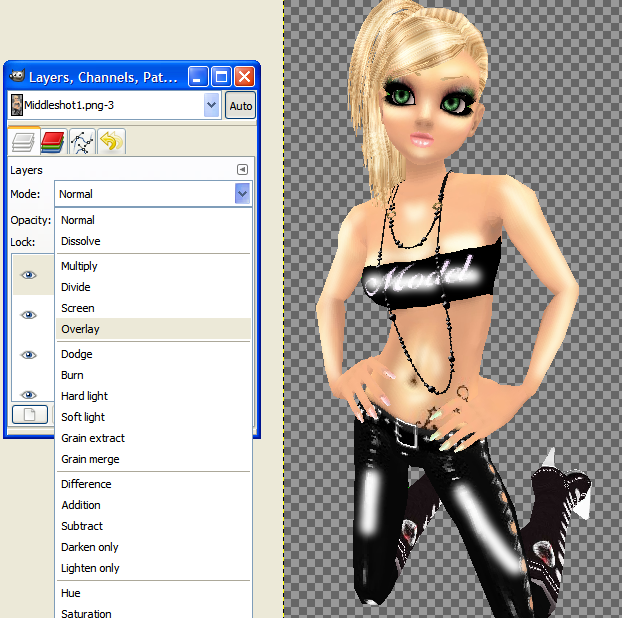
| Creating an outline around text by Wonder/Yui
Okay , so I guess there's many ways of doing this ... but this way just sprung to my head and I find it really easy . ^^
BTW , Before we start , set the FG colour to whatever colour you want the outline to be . ^^ The FG colour is the top one , like when you start GIMP , you have Black && White . Black is your FG Colour . ^^
OKAY ! So basically , I'm gonna start with this text :
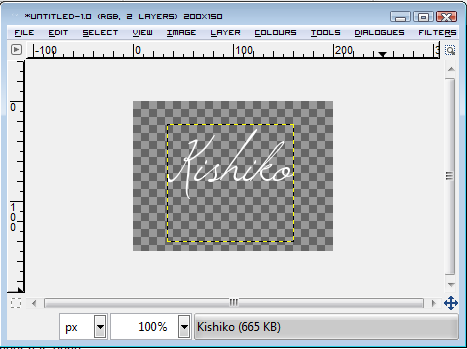
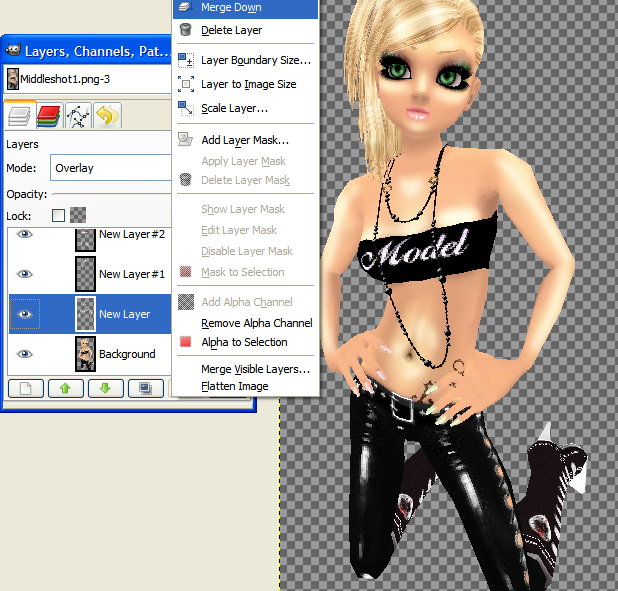
Next , simply duplicate the layer , and select the lower text layer , then go to Layer>>Transparancy>>Alpha To Selection
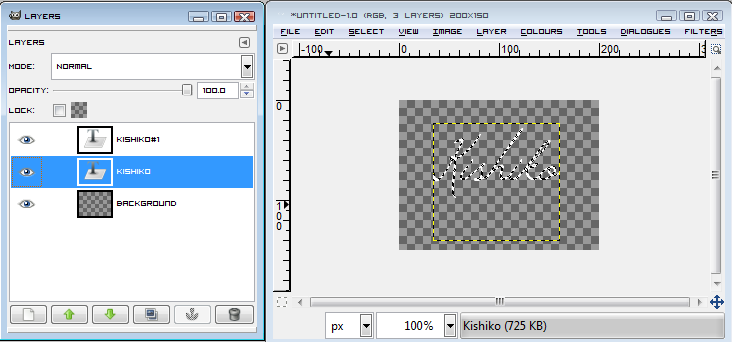
Then , Go to Select>>Grow
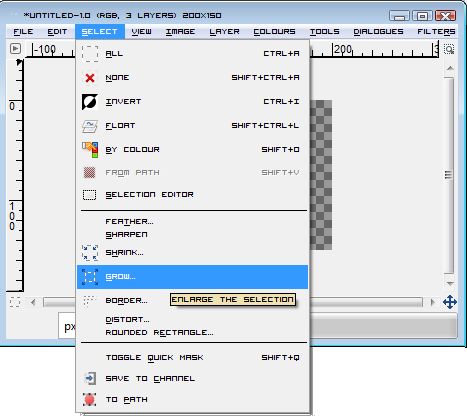
Set it to whatever you want , but I'm going to set it to 1 .

Then , go to Edit>>Fill With FG Colour

Basically now , go to Select>>None , or just press Ctrl + Shift + A .
And TA - DA ! You have outlined text ! My finished product came out like this ;
 | |
|
| | |
xCreate
Member
Posts : 58
Join date : 2009-04-27
Age : 34
Location : New York
| | Subject: Re: GIMP Tutorial Archive Fri May 01, 2009 5:08 am | |
| Adding fonts to GIMP by Wonder/Yui
NOTE - This will also make it so that the font is avaliable in all the aplications you use ! =]OKAY ! so all you needa do once you've pressed download is to push the okay button when the popup comes up which should open it up with Windows Explorer [[Mine says Winzip , but that's because it made it the default program . x'']

Next , when windows explorer opens , find the control panel on the list on the left and click the arrow to open it , and then drag the folder or just the text file(s) down to the part called 'fonts' under control panel .
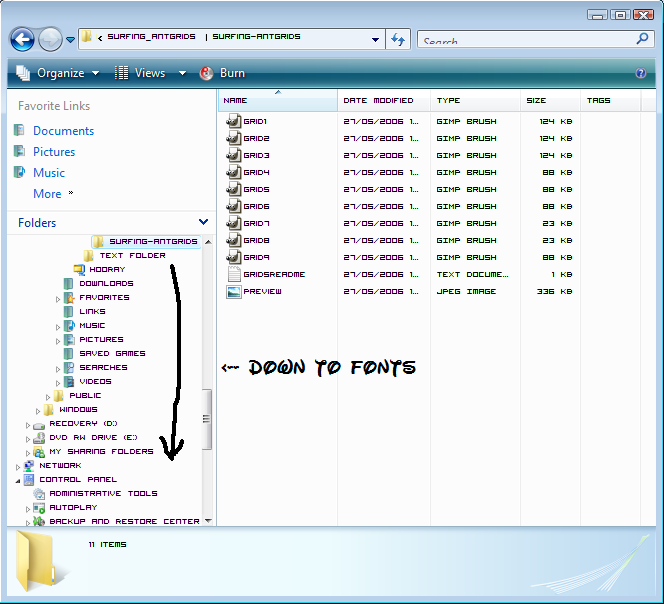
Then just drop it in , open GIMP , and it should be there ! And on any other program you use ! ^^
NOTE - I used Windows Vista for this , you may have to make slight alterations if you use XP or 2000 [Not sure anybody actually uses 2000 anymore though . LOL][/size] | |
|
| | |
xCreate
Member
Posts : 58
Join date : 2009-04-27
Age : 34
Location : New York
| | Subject: Re: GIMP Tutorial Archive Fri May 01, 2009 5:09 am | |
| | |
|
| | |
xCreate
Member
Posts : 58
Join date : 2009-04-27
Age : 34
Location : New York
| | Subject: Re: GIMP Tutorial Archive Fri May 01, 2009 5:09 am | |
| | |
|
| | |
xCreate
Member
Posts : 58
Join date : 2009-04-27
Age : 34
Location : New York
| | Subject: Re: GIMP Tutorial Archive Fri May 01, 2009 5:10 am | |
| | |
|
| | |
Sponsored content
| | Subject: Re: GIMP Tutorial Archive | |
| |
|
| | |
| | GIMP Tutorial Archive | |
|


 XD*
XD*